Monday, October 28, 2013

Revlon Nail Art Chalkboard First Impression

I love anything matte black, anything matte tbh. I think it stems from my love for batman haha! I just love the way matte can really add another dimension to an outfit, even if it is just on your nails!

Matte nails are definitely on trend for this Autumn and Winter so when i saw that Revlon had brought a range of their dual ended nail art sticks out that were called Chalkboard i jumped and bought one!
There are 6 sticks to choose from each with 2 colours. I picked up Liberal Arts which has a black and a white enamel.


 Matte nail polish's are notoriously hard to make last even if you do have a matte top coat so i wasn't really expecting much from this when i first tried it!
The black end has a large, thick brush that is perfect for covering my nail with just one stroke! And the white has a long thin brush perfect for doing designs on the nail with. I have to admit though, i haven't actually used the white...i know, i know! I'm doing a review on the product and haven't used half of it! Shocking!!! But i decided to just give the black a go first and then i would use the white side if i liked the black. This is what i did with my nails....

Yes this does have an instagram filter over it but this is because i deleted the original photo, sorry!
Picture below of the polish's i used on my ring finger

I actually quite like the effect you get with the black. The enamel it self is easy to apply and depending on the size of your nails depends on how many coats you need. For my pinky, middle and pointer finger i only needed one/2 strokes, one coat but for my thumb i needed 2 coats and multiples strokes. It dried fast which is great because it meant if you did want to do a design with the white by the time you'd painted all your fingernails the ones you painted first would be stone dry so you could make a start! Personally from the pictures i've seen of the chalkboard effect i'm not the biggest fan of it but you might be different! 
On to how long it lasted...I painted my nails Thursday night and unfortunately by Saturday morning they were chipped and the ones that weren't chipped were showing the edges of the tip of my nail. This might be different with a matte top coat but i don't own one as of yet (REALLY need to get my hands on one though!). I almost expected it to only last till lunch time Friday so i'm kind of impressed that it lasted till Saturday but i would really love matte nails to last longer!

As for my ring finger in this design i used Rimmel I <3 lasting finish in Black Cab topped off with Miss Sporty Oh My Gem in Be A Star.


 clear/purple base packed full of large purple pieces of glitter and tiny blue glitter


So in all i'm kind of impressed with this, it's easy to use, quick drying and lasts almost a day longer than i thought it would haha! If i ever do use the white i will definitely post a picture! But for now i'm still not liking the effect in pictures so it might be a while, maybe if i was to go out as a school girl for halloween but i'm not so....

Look out for an October favourites and a What I Wore - Halloween edition coming up this week!!


Kat
xoxox


Thursday, October 17, 2013

What I Wore - Wedding

So last Saturday I was a guest at a wedding and I thought I would show you my outfit, make-up, hair, nails etc!

Lets start with my hair....

I can never get my hair to sit right when I actually need it too! I'm one of these people who will have perfect hair that will do what i want to when i'm actually not doing anything but sit about the house. But the minute i need it to curl, straighten or even just sit right it decides that thens a good time to go a bit crazy. Even when I went to the hairdressers my hair would be fine for a few hours then spring back to its normal horrible self....all this was before i met Anna (Heres a link to her Facebook, please go and like and comment and if your nearby book your next cut with her, she is just wonderful!). Im not even exaggerating when i say that she's a genius when it comes to hair. I met her when she did my hair for a fashion show i was modelling in and since then she's been my hairdresser so naturally when i realised i was probably going to loose the battle with my hair again i booked an appointment! I started looking on Pinterest for up do's because my dress had a lot of lace detailing around the neck and i wanted to show it off but i wanted to incorporate the braiding trend that is huge for this autumn/winter! So this is what we came up with....

 It's just absolutely gorgeous isn't it??? I got sooo many compliments from people! Anna basically started by curling all my hair then doing 2 fishtail braids one on each side of my head, she then pinned them into place before gathering all the rest of the hair and pinning it to create a kind of messy bun.


My make-up next....

First I want to apologise for the amount of pictures i only realised just now that i could of done one picture with all the things i used! Oh well, next time i'll do that but just now you'll just have to cope with a few extra pictures than there needs to be!

Heres a picture of the finished look...

Because I had decided on a monochrome look with a splash of red, I decided to do red lips. Now when it comes to make up i looove bold bright colours on the eyes but because i was going for such a statement lip colour i decided to just go for a simple cat eye. I thought it matched the hair quite nicely too.

For the main products I used in this look I'm going to direct you here. Mostly everything i used was mentioned in my haul and review there. The foundation is Urban Decay Naked (my colour is 2.0) applied over moisturiser with the UD Good Karma Optical Blurring Brush. For my eyes I used 2 colours from UD's Vice 2 palette, DOPE all over the lid and then AMBUSH on the outward corner and blended up onto the brow bone (not too far though!) and then as a highlight i used DOPE again under the eyebrow. For my lips i used MAC Viva Glam The Original lipstick and lipglass. For my the rest I used....
Maybelline Gel Eyeliner in Black. I actually apply this with an old lip liner brush, I just get a better result from it rather than an eyeliner brush! I get a sharper point on the flick in a cat eye!

Bourjois Delice De Soleil. I love this bronzer! Apart from the fact it smells AMAZING (tropical coconut) It really does give you a soft bronzed look that you can build up easily without looking over done! It is slightly shimmery in the pan but once used it's almost matte. I used this on the parts of my face that would naturally tan (forehead, cheek bones) and then applied it on my jaw line for a little bit more definition.

Maybelline blusher. I am so so sorry but i cant find the name of this anywhere!!! All I know is that it's a soft red/brown almost bronze colour that is lovely for a bit of colour on my cheeks! Sorry!!

For my nails i actually ended up buying products to create what i had in my head and i was so happy the way it turned out!! I'm going to apologise (again) for the state of my nails in the first picture it was taken before i cleaned them up and then i forgot to get a proper picture after the clean up!! 

Aaah!! They're really messy!!! 

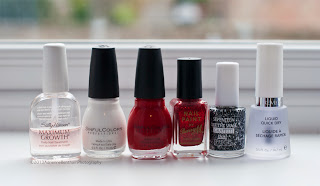
Here's what I used to create them....

(Left to Right)
Sally Hansen Maximum Growth, Sinful Colors - Snow Me White, Sinful Colors - Gogo Girl , Barry M - 150, Seventeen Nail Effects - Monochrome, Rimmel Liquid Dry, and then I used the Sally Hansen Maximum Growth as top coat because my nails just seem to last longer without chipping if i have a coat of that on top!!

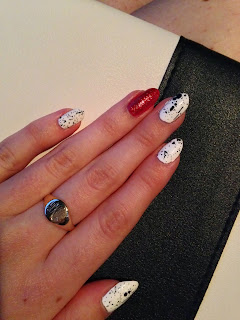
Here's a picture of my nails after clean up that I took at the wedding...


I was really quite happy with them and i really love the effect of the Seventeen nail effects on top of the white!!

For my accessories i kept it so simple! Just my bag and a bracelet! Oh! and my beautiful shoes of course!!

This clutch is from Primark, but to be honest i dont think it looks as if it is! It's so classic and simple that it could be from Warehouse or maybe even Zara! (my favourite places for clutch bags!) I love the white and black with the nude on the bottom part of the back! And it isn't stupidly thin either! It has a kind of expanding bitt at the bottom which meant i could fit my phone, purse, lipstick etc in it without it giving it a strange shape!

I honestly have no idea where this is from, i think it was a birthday present a few years ago but i love it! Its chunky but not too chunky that it looks silly on my skinny wrists and the skulls give it a little bit of a rocker kick!

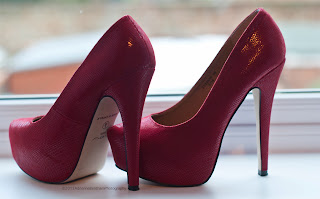
Now onto these babies! The shoes I originally bought ended up being to big for me so i went looking for replacements. I found these in New Look and i just adore them! The colour, the almost snake skin print!!!! *sigh* they're perfect. They're also really comfortable! They have a sort of cushiony sole inside them which makes them really soft and easy to walk in (and dance).

Now the important bit!! The dress and the whole outfit all together!! 

 The lighting isnt the best but you can see the dress! I bought it on Ebay actually! When i first tried it on i got a bit worried about how tight it was but with some help from Boux Avenue that wasn't much of a problem. The lace is what sells it for me to be honest, It's a gorgeous touch and made my feel quite sophisticated. The blazer is one i got in H&M last year.

Slightly better lighting but kind of out of focus now! 

I love weddings, they're always so happy! Its the one party that you can go to and know that there probably won't be any fights or anything and it's just all love and happiness! And this one had a pic 'n' mix which made my night!!

Anyway I hope you enjoy this little 'What I Wore' and hopefully there will be more to come as we go into the festive season (maybe a Halloween one??).

Hope your having a wonderful Thursday!

Kat
xoxox


Tuesday, October 15, 2013

High End Make-up Haul and Review

So!! I'm not really going to put much of an introduction for this post. I just want to say that from now on i will be posting regular reviews, make-up looks and nail designs every Tuesday and Thursday (maybe Friday).

Lets get stuck in!!!

This is a bit of a high end beauty haul. I've always loved the idea of being able to afford the high end make-up products like Chanel and Dior (come on! Who doesn't!!). My two most desired products are from MAC and Urban Decay. I love Macs products because they are staples that everyone can use! They have such a huge variety of products available too and the collections they bring out are always gorgeous! Urban Decay is the same, I mean everyones heard of the Naked palettes by now! (If you haven't, i'm sorry but where have you been?!) But the main reason i love UD is it's bright, colourful and sparkly shadows and eyeliners! They're prepping and finishing products are raved about too!!

I'll start from when I decided to take a leap and purchase my first high end make-up product! Urban Decay brought out a Vice Palette about a year ago and it was snapped up all over the world and beauty gurus everywhere spoke about it! So when they announced their Vice 2 palette i got VERY excited! Especially when I saw Xsparkage (www.xsparkage.com) review and tutorials using it I knew i had to have it!!!

The price did put me off a bit for a while but i think that was just because I had never spent that mach on one make-up product, ever!! But I went up to my nearest UD counter (Debenhams, Silverburn, Just outside Glasgow) and just took the plunge!

  •  I love the packaging, the colour and pattern is gorgeous! It reminds me a little bit of butterflies wings! Anyone else see it?
  • I also love how it opens, theres a button to push on the front and when you push it the lid slowly opens up to reveal a full sized mirror and the 20 shadows

  • There is 20 gorgeous brand new, never seen before shadows. A great mixture of matte, shimmer and metallics. All just begging to be used!
  • The great thing about this palette is that all the shadows can be used with each other to create so many different looks, smokey, bright and natural.
  • Theres hardly any fall out either! Which from the reviews i've read is unusual for UD's sparkly shadows! But even the shadows that are packed with shimmer and sparkles there is barely any fall out!!
  • The double ended brush you get is amazing quality too! One end is a normal shadow brush and the other is a blending brush. They are just fantastic!
  • My favourites in the palette are: COAX (4th on top) which is a gorgeous pink metallic! I was surprised i liked this so much since i'm not really the biggest fan of pink but i think it'll look great as an accent colour in a look. PRANK (1st on 2nd row) which is a dual tone shimmer, dark blue base with electric blue shimmer through it. DAMAGED (2nd, 3rd row) A beautiful metallic green that i can't wait to use in a mermaid inspired look!!! BETRAYAL (4th, 3rd row) A dual tone light lilac shimmer that in certain light almost looks as though it has blue through it. Last but not least TOXIC (2nd, 4th row) a rose gold shimmer that is going to be perfect for the Autumn!

Swatches (Left to Right) Coax, Prank, Damaged, Betrayal and Toxic


When I bought the Vice 2 my blog came up in conversation and the girl gave me 2 samplers! One of the Naked foundation and one of 4 lipsticks. I have to be honest and say i actually haven't tried the lipstick samples but I used the foundation the next day and I fell in love with it!! The shade was 1.0 which was a bit too light for my skin but I wore it with some bronzer and it wasn't too noticeable! Normally with foundation i've used in the past, by about lunch time it's slid and is looking ridiculously oily on my T-zone! So when I got home at the end of the day and realised that the foundation was still in place and completely matte i knew I HAD to have it!!
So on Friday I went back up to the shopping centre that has a UD counter I asked to be matched to a shade and the girl was lovely and actually re-did my whole face using UD products! Finishing it with the All Nighter setting spray! My shade in the Naked foundation is 2.0.

  • The packaging is so clean and high end looking! I love that you can see the product in the tube!
  • The pump is hygienic! and is easy to keep clean!
  • This foundation is honestly the best foundation I have ever used! It blends in perfectly and you can build it depending on how much coverage you want! Obviously if you build it too much it will cake but thats the same with most foundations! (despite what they claim!)
The girl at the counter used the Good Karma optical blurring brush to apply the foundation, I loved the way it felt on my skin and i've been looking to start applying my foundation with a brush because it really is so much more hygienic!! So I decided to add it too my basket too!

  • I dont really have much to say about this other than it is amazing at giving you that flawless, airbrushed look!
The girl then set my make-up with the All Nighter Setting Spray, because whenever i bought a cheap one it just didn't do what UD's setting sprays claimed to do and some even made my skin greasier and actually break out!!

  • It has 2 lids, the big purple one and then a second covering the actual pump which i thought was a great idea!! Very hygienic!
  • Dry's immediately so you don't have to wait for it to dry before you can touch your face or open your eyes!!
  • I used this to set my make-up for a wedding i went to on Saturday. I was so tired when i got in that i didn't take my make-up off (which i'm now paying for with a horrible break out!!) and it was still perfect when i woke up! I mean i could of seriously gone back out and it would of looked as if i'd just done my make-up!!
Heres a wee picture of them all in their original packaging!


Wow! this is going to be a looooong post!!!

Right now onto MAC!!!! I'm claiming I "accidentally" walked into the MAC counter....although i'm not sure people are buying it!! I've often gone in and looked at all the MAC products and if i'm being honest I always feel a little bit intimidated by all the products! theres just so many to look at and I always was scared that if I asked one of the girls for help I would be forced into buying something i didn't actually need! This time was different, i decided i would ask about a red lipstick for the wedding i was going to the next day. So when a girl approached and asked if she could help me i took a deep breath and jumped right in! I told her what I was looking for and she immediatly told me i should buy what she was wearing because it would go with my eyes! I'm not really sure if that was her way of making sure i bought it and if it was it kinda worked! The lipstick turned out to be Viva Glam The Original part of the RuPaul collection. It is based on the original formula first introduced in 1994. 

  • The colour is a gorgeous matte deep red that looks super sexy!
  • I love the packaging! It's compact and the deep red accent when you open it up is really lovely to look at
  • The formula of this is rich and soft and surprisingly quite moisturising for a matte! It also acts almost like a stain, I didn't need to keep reapplying after having a drink!

The girl then recommended the matching Viva Glam lipglass and let me test it on my hand. I loved the feel of it so i decided to take it too.

  • Again compact and small, perfect to put in your clutch on a night out!
  • The formulation is gorgeous! Its not sticky at all so you dont have to worry about your hair sticking to your lips on a cold winters night!
  • It is a gorgeous colour perfect for Autumn/ Winter and I cant wait to rock this and the lipstick on nights out!


Swatches (left to right) Lipstick, lipglass and both

As I got to the counter to pay the girl pointed out the new In Extreme Dimension 3D Black Lash (phew! such a big name!) mascara. I'm always looking for new mascara that will make my lashes look fuller and longer. The girl claimed that this mascara would definitely give that false lash effect without clumps, and you know what? She was right!!

  • It's truly amazing! The packaging is gorgeous and sleek. I love the shape of the lid and it actually makes it a little easier to hold
  • The brush is large but is so precise and really does make it look as if you have fake lashes on!


Here's a picture of the packaging, I really can't help it i love the way MAC boxes everything!


So thats the end of this high end make-up hauls/review!! BUT!!! I thought i'd throw these in at the end since i bought them on the same day as i bought the majority of the things here!

I've been looking to replace all my old perfumes slowly and I went into look at the Vivienne Westwood 'Alice' perfumes. I smelled them all and decided that i would go for Naughty Alice. Im not great at describing smells so i'm not even going to to try and explain it all i can say is that it smells good. I decided to buy the gift set which came with a 50ml of the perfume and a moisturiser. But the box it came in doubles up as a jewellery box with a little mirror on the inside! Also because i bought the 50ml perfume i got a free Vivienne Westwood sketchbook! 


I also got this....it's my first Autumn/Winter candle this year, a Yankee Candle called Fireside Treats and OMG! it smells like toasted marshmallows! I just adore it!! I actually originally picked it up as a gift for my best friends birthday but ended up buying two because i just couldn't leave without one for myself! I had it burning in my room last night and everyone in my house could smell it and wherever you went in the house all you could smell was toasted marshmallow! *sigh* I love autumn!


Right so i'm soooo sorry about the length of this post!! I really didn't think it would turn out this big, turns out i had a lot to say then!


Speak soon! 

Kat
xoxox